CS 148: Introduction to Computer Graphics and Imaging (stanford.edu)
Introduction & Geometry and Transformations
Blender操作和两个作业(Sphere&Transformation)
Sphere1
2
3
4
5
6
7
8
9
10
11
12
13
14
15
16
17
18
19
20
21
22
23
24
25
26
27
28
29
30
31
32
33
34
35
36
37
38
39
40
41
42
43
44
45
46
47
48
49
50
51
52
53
54
55
56
57
58
59
60
61
62
63
64
65
66
67
68
69
70
71
72
73
74
75
76
77
78
79
80
81
82
83
84
85
86
87
88
89
90
91
92
93
94
95
96
97
98
99
100
101
102
103
104
105
106
107
108
109
110
111
112
113
114
115
116
117
118
119
120
121
122
123
124
125
126
127
128
129
130
131
132
133
134
135
136
137
138
139
140
141
142
143
144
145
146
147
148
149
150
151
152
153import bpy
import bmesh
import math
# Your job is to write a program that fills in
# the right vertex locations and faces to make a sphere.
# I is the number of stacks minus 1 (Since we count from 0)
I = 10
# J is the number of sectors
J = 15
# r is the radius
r = 10
vertex_locations = []
faces = []
############## TODO: ADD VERTICES ##############
# 1. Add the top vertex (i = 0)
# 2. For each stack, and each sector in that stack,
# add a vertex (i between 1 and I - 1)
# 3. Add the bottom vertex (i = I)
# TODO: Add the top vertex (i = 0)
vertex_locations.append((0.,0.,-10.)) # FIX THIS LINE
# TODO: For each stack, and each sector in that stack,
# add a vertex (i between 1 and I - 1)
# NOTE: You could use theta and phi to find the correct (x,y,z) coordinate
# You could also figure out the height of each stack to find z,
# use the radius and z to find the radius of that stack,
# and use the stack radius and theta to find x and y.
# Or you could find some other intuition! How do you parse a sphere?
# NOTE: Just make sure to take note of the vertex order - you'll need that!
for i in range(1,I):
for j in range(J):
# x = 10 # FIX THESE LINES
z = (i * 2 * r / I) - r
stack_raidus = math.sqrt(r**2 - z**2)
theta = 2 * math.pi * j / J
x = stack_raidus * math.cos(theta)
y = stack_raidus * math.sin(theta)
vertex_locations.append((x,y,z))
# TODO: Add the bottom vertex (i = I)
vertex_locations.append((0.,0.,10.)) # FIX THIS LINE
############## TODO: ADD FACES ##############
# 1. Add the top face ring (i = 0)
# 2. Between every two sectors in a stack, add two triangles
# to form a quad below them. (i between 1 and I - 2)
# (I - 1 is the bottom sector, so there is only the bottom ring below)
# 3. Add the bottom face ring (i = I)
# TODO: Add the top face ring (i = 0)
# NOTE: For every sector, you want the face to connect
# your point with the following point and the top point
# EXCEPT the last sector, which you want to wrap back around
# to the first sector in the stack. You'll need a separate case here.
# NOTE: What index is the top point? If it's the first point in your array,
# it should be 0
# FIX AND EXPAND THIS BEYOND JUST ONE LINE OF CODE
for j in range(J):
if j == J - 1:
faces.append((0, j + 1, 1))
else:
faces.append((0, j + 1, j + 2))
# TODO: Between every two sectors in a stack, add two triangles
# to form a quad below them. (i between 1 and I - 2)
# NOTE: Looking at two consecutive sectors in a stack: v1 and v2,
# what are the indices of v1 and v2? What are the indices of the
# two points below v1 and v2?
# How will you compose 2 triangles out of these 4 points?
# NOTE: As before, when you get to the last sector, you must wrap back around
# to the first sector in that stack. This is a different case for
# calculating the indices.
for i in range(0, I-2):
for j in range(J):
n = J * i + 1 + j
if j == J - 1:
faces.append((n , n + 1 - J, n + J))
faces.append((n + 1 - J, n + J, n + 1))
else:
faces.append((n , n + 1, n + J))
faces.append((n + 1, n + J, n + J + 1))
print(faces)
# ADD LINES OF CODE TO GENERATE TWO TRIANGLES
# TODO: Add the bottom face ring (i = I)
# NOTE: For every sector, you want the face to connect
# your point with the following point and the bottom point
# EXCEPT the last sector, which you want to wrap back around
# to the first sector in the stack. You'll need a separate case here.
# NOTE: What index is the bottom point? If you have "x" points total, it should be
# indexed "x - 1". How can you calculate the index? This should follow the
# same pattern as finding the indices above.
# FIX AND EXPAND THIS BEYOND JUST ONE LINE OF CODE
for j in range(J):
if j == J - 1:
faces.append((len(vertex_locations) - 1, len(vertex_locations) - 2 - j, len(vertex_locations) - 2))
else:
faces.append((len(vertex_locations) - 1, len(vertex_locations) - 2 - j, len(vertex_locations) - 3 - j))
################ Don't worry about anything below this! ################
#### Although it's good to read if you're interested in Blender scripting! ####
# Delete any old object - rename anything you want to keep!
for o in bpy.context.scene.objects:
if o.name == "mySphere":
o.select_set(True)
bpy.ops.object.delete()
# Find collection, and make one if none exists
if len(bpy.data.collections) < 1:
new_collection = bpy.data.collections.new('Scene Collection')
bpy.context.scene.collection.children.link(new_collection)
collection = bpy.data.collections[0]
# Create a new mesh and object to put the data into
sphere_mesh = bpy.data.meshes.new('mySphere_mesh')
sphere_object = bpy.data.objects.new('mySphere', sphere_mesh)
# Add object to scene collection
collection.objects.link(sphere_object)
# Bmesh is a method of editing the mesh data within an object
bm = bmesh.new()
bm.from_mesh(sphere_object.data)
# Now we'll add all the vertices into the new mesh
vertices = []
for v in vertex_locations:
vertices.append(bm.verts.new(v))
# For the faces, we want the bmesh vertices, instead of the integer indices
for f in faces:
face = [vertices[i] for i in f]
bm.faces.new(face)
# Finally, we'll reload the mesh into the object!
bm.to_mesh(sphere_object.data)
bm.free()
Transformation1
2
3
4
5
6
7
8
9
10
11
12
13
14
15
16
17
18
19
20
21
22
23
24
25
26
27
28
29
30
31
32
33
34
35
36
37
38
39
40
41
42
43
44
45
46
47
48
49
50
51
52
53
54
55
56
57
58
59
60
61
62
63
64
65
66
67
68
69
70
71
72
73
74
75
76
77
78
79
80
81
82
83
84
85
86
87
88
89
90
91
92
93
94
95
96
97
98
99
100
101
102
103
104
105
106
107
108
109
110
111
112
113
114
115
116
117
118
119
120
121
122
123
124
125
126
127
128
129
130
131import bpy
import bmesh
import math
import numpy as np
cones = []
def reset_scene():
for o in bpy.context.scene.objects:
o.select_set(True)
bpy.ops.object.delete()
def add_cone(name):
# Create a new mesh and object to put the data into
bpy.ops.mesh.primitive_cone_add(location=(0,0,0))
cone_object = bpy.context.active_object
cone_object.name = name
# Bmesh is a method of editing the mesh data within an object
bm = bmesh.new()
bm.from_mesh(cone_object.data)
cones.append((cone_object, bm))
return bm
def apply_transforms():
for cone in cones:
bm = cone[1]
cone_object = cone[0]
bm.to_mesh(cone_object.data)
bm.free()
####################### DO NOT EDIT ABOVE THIS LINE! #######################
def translate_matrix (distance, axis):
# TODO: Edit this matrix to be the correct translation matrix
# X_AXIS = 0, Y_AXIS = 1, Z_AXIS = 2
if axis == 0:
arr = np.array([ [1, 0, 0, distance],
[0, 1, 0, 0],
[0, 0, 1, 0],
[0, 0, 0, 1]])
elif axis == 1:
arr = np.array([ [1, 0, 0, 0],
[0, 1, 0, distance],
[0, 0, 1, 0],
[0, 0, 0, 1]])
elif axis == 2:
arr = np.array([ [1, 0, 0, 0],
[0, 1, 0,0],
[0, 0, 1, distance],
[0, 0, 0, 1]])
return arr
def rotate_matrix (degrees, axis):
# TODO: Edit this matrix to be the correct rotation matrix
# We want to keep the 4x4 version so that we can multiply it with the
# translation matrix, which has to be 4x4 as discussed in lecture.
# X_AXIS = 0, Y_AXIS = 1, Z_AXIS = 2
if axis == 0:
arr = np.array([ [1, 0, 0, 0],
[0, math.cos(math.radians(degrees)), -math.sin(math.radians(degrees)), 0],
[0, math.sin(math.radians(degrees)), math.cos(math.radians(degrees)), 0],
[0, 0, 0, 1]])
elif axis == 1:
arr = np.array([ [math.cos(math.radians(degrees)), 0, math.sin(math.radians(degrees)), 0],
[0, 1, 0, 0],
[-math.sin(math.radians(degrees)), 0, math.cos(math.radians(degrees)), 0],
[0, 0, 0, 1]])
elif axis == 2:
arr = np.array([ [math.cos(math.radians(degrees)), -math.sin(math.radians(degrees)), 0, 0],
[math.sin(math.radians(degrees)), math.cos(math.radians(degrees)), 0, 0],
[0, 0, 1, 0],
[0, 0, 0, 1]])
return arr
def transform_cone(cone_bm, matrix):
# You do not need to edit this function, but you might want to include
# more print statements to the OS console for debugging!
for v in cone_bm.verts:
print("----------Vertex BEFORE transformation (x, y, z)----------")
print(v.co)
# Apply the transformation matrix to every vertex
r = np.matmul(matrix, np.append(np.asarray(v.co), 1))
v.co = r[:-1]
print("----------Vertices AFTER transformation (x, y, z)----------")
print(v.co)
# Do not touch this line. This just clears the scene.
reset_scene()
# These add 4 cones, each with the names in quotes as you see below.
# The names will show up in the Scene Collection in Blender to let you
# differentiate amongst the cones.
# You should not need to edit these lines.
q1 = add_cone("rot_45_x_rot_45_y")
q2 = add_cone("rot_45_y_rot_45_x")
q3 = add_cone("trans_10_x_rot_45_y")
q4 = add_cone("rot_45_y_trans_10_x")
# TODO: Uncomment the lines below to apply the appropriate transformations
# to all 4 cones. They are commented out for now, since you'll likely prefer
# to just work with 1 cone at first for debugging purposes.
# When debugging your matrices, you'll want to only enable one transformation
# at a time, as your OS console will get flooded by print outs of all the
# changed cone vertices for each transformation.
print("Rotate X 45")
transform_cone(q1, rotate_matrix(45, 0))
print("Rotate Y 45")
transform_cone(q1, rotate_matrix(45, 1))
print("Rotate Y 45")
transform_cone(q2, rotate_matrix(45, 1))
print("Rotate X 45")
transform_cone(q2, rotate_matrix(45, 0))
print("Translate X 10")
transform_cone(q3, translate_matrix(10, 0))
print("Rotate Y 45")
transform_cone(q3, rotate_matrix(45, 1))
print("Rotate Y 45")
transform_cone(q4, rotate_matrix(45, 1))
print("Translate X 10")
transform_cone(q4, translate_matrix(10, 0))
# Do not touch this line. This applys the transformations above.
apply_transforms()
Rasterization and Shading
Phong Reflection Model
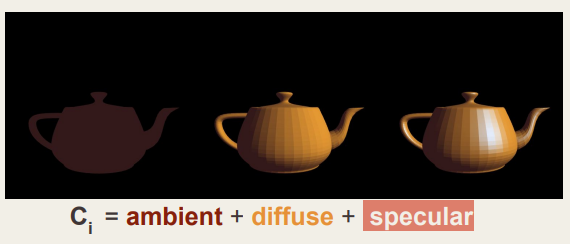
$c=c_{a}+c_{d}c_{l}max(0,n\cdot l)+c_{specular}$
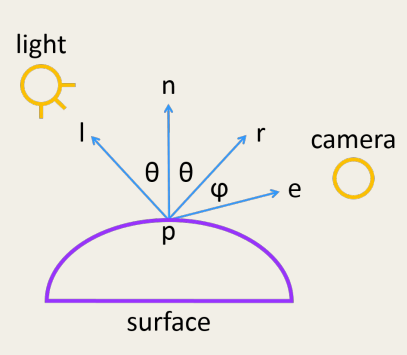
$c_{specular}=c_sc_lmax(0,e\cdot r)$
=>+ shininess value: how shiny we want to tune the material
$c_{specular}=c_sc_lmax(0,e\cdot r)^\alpha$
=>+ 反射r不好计算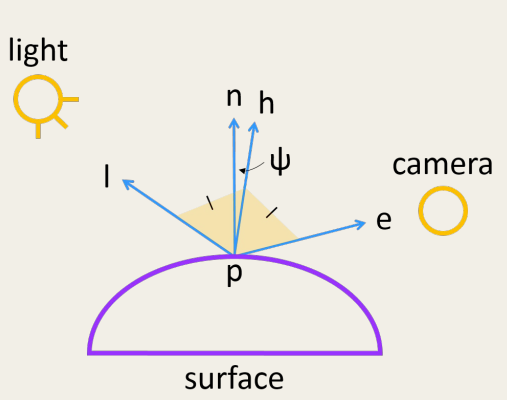
计算l和e的halfway vector h, 当e与r对齐时,h与n对齐
$h=\frac{e+l}{|e+l|}$
$c_{specular}=c_sc_lmax(0,n\cdot h)^\alpha$
最终:$c=c_{ambient}+c_{diffuse}+c_{specular}$
$\begin{aligned}c&=c_a+c_dc_lmax(0,n\cdot l)+c_sc_lmax(0,n\cdot h)^\alpha\end{aligned}$
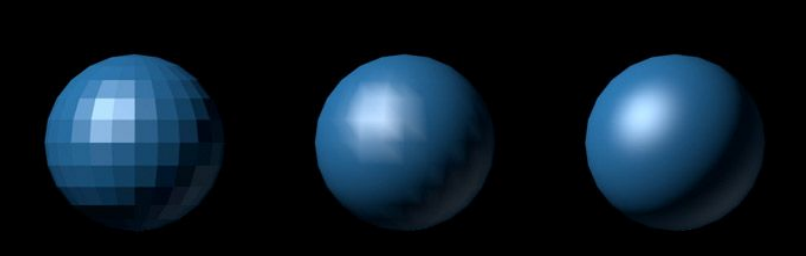
How do we make the teapot image look smooth?

Gourad Shading:
a. b. c. 三个vertex的颜色值和法向量,则三角形中任意一点v
$c_{v}=\frac{A_{a}}{A_{total}}c_{a}+\frac{A_{b}}{A_{total}}c_{b}+\frac{A_{c}}{A_{total}}c_{c}$
$n_{v}=\frac{A_{a}}{A_{total}}n_{a}+\frac{A_{b}}{A_{total}}n_{b}+\frac{A_{c}}{A_{total}}n_{c}$

对比三种不同计算颜色的方法:
| name | 方法描述 | result |
|---|---|---|
| Flat | 使用每个顶点计算出的颜色平均值为三角形着色 | simple, fast, but looks bad. |
| Gourad | 通过对每个顶点的颜色进行内插,对三角形进行阴影处理 | good balance between speed and visual result |
| Phong | 内插每个顶点的法线,然后计算三角形中每个点的颜色 | expensive but best look! |
- 光栅化的pipeline

Color, Images, and Cameras
The images we create ARE NOT intended to duplicate reality, only to fool humans into believing such
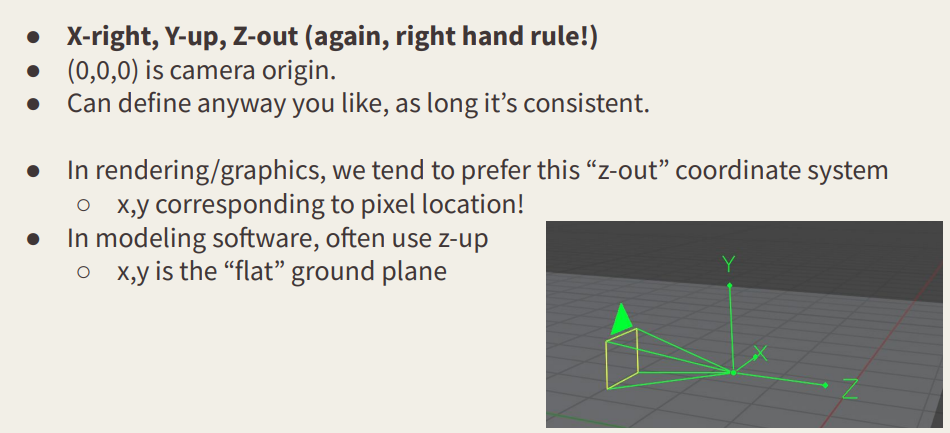
Camera
相机坐标系
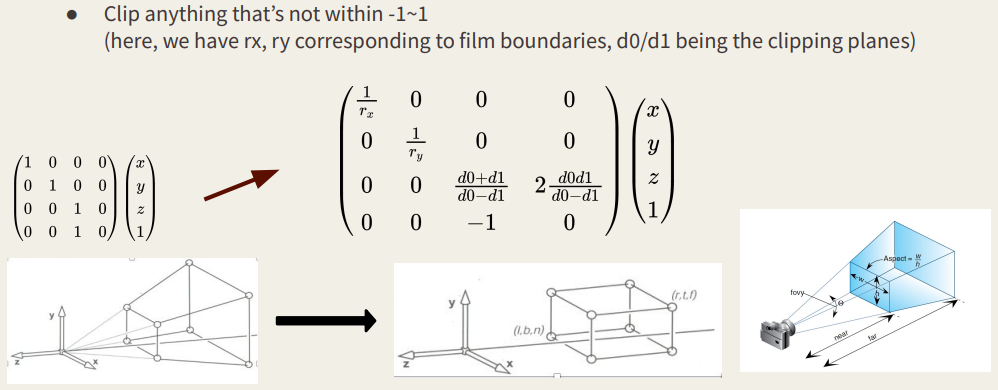
投影变换矩阵,将锥形空间转换到正方体空间orthographic clipping space
transform viewing frustrum to an orthographic bounding box
$\begin{pmatrix}\frac{1}{r_x}&0&0&0\\0&\frac{1}{r_y}&0&0\\0&0&\frac{d0+d1}{d0-d1}&2\frac{d0d1}{d0-d1}\\0&0&-1&0\end{pmatrix}\begin{pmatrix}x\\y\\z\\1\end{pmatrix}$
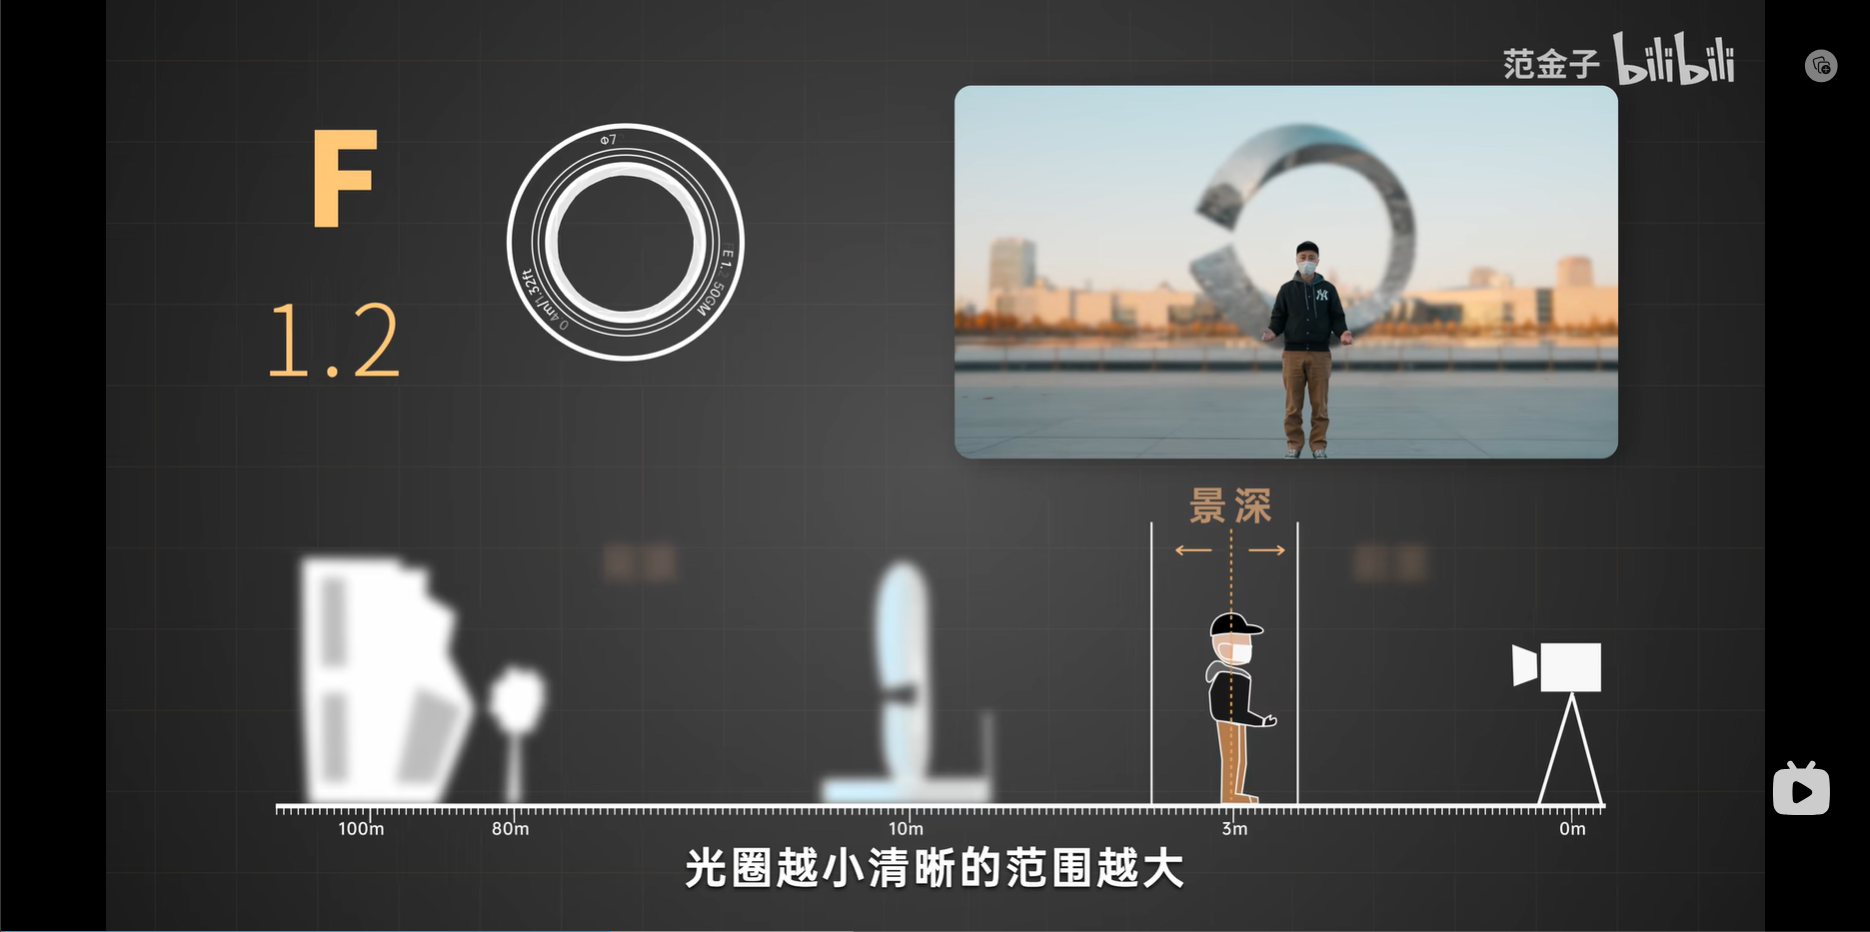
焦距f越小,传感器h越大==>视野越宽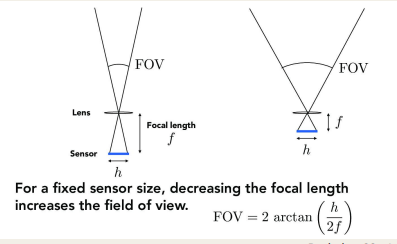
光圈越大,景深越大还是越小?
- F = 焦距/入瞳直径 ==> 控制曝光,影响景深
- F越小 —> 光圈越大 —> 入瞳直径越大 —> 景深越小
Light and Optics
3D ==> solid angle
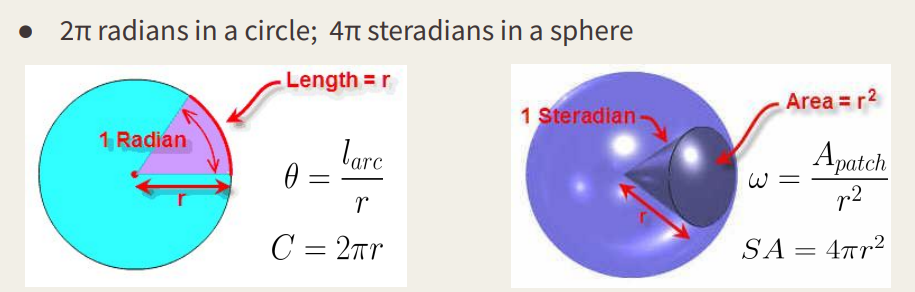
辐射强度Radiant Intensity:$I(\omega)=\frac{dP}{d\omega}$ 光源在每个solid angle上的功率power,单位w
- 各项异性光源:辐射强度在整个光源中都是不同的,需要function of steradians立体角的函数
- 各项同性点光源:对$\begin{aligned}dP=Id\omega\end{aligned}$积分 ==> $P=\int_{sphere}Id\omega=4\pi I$
辐照度Irradiance: 光照射物体单位表面积的功率。光的单位表面积功率$E=\frac{dP}{dA}$
- 如果表面倾斜,则辐照度减小:$E=\frac{dP}{dA}\rightarrow E_{tilted}=\frac{\frac{A\cos\theta}{A}P}{A}=E\cos\theta$
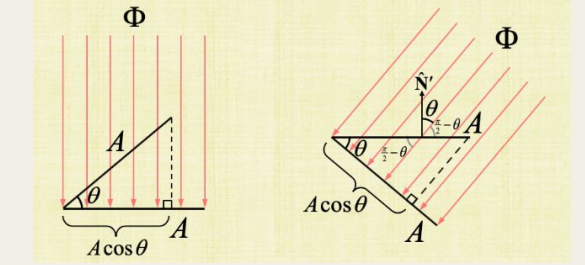
- Irradiance
- varies based on tilt angle of surface with light
- varies based on distance from light
现实世界中,光源不是点,而是一个单位面积,因此将辐射度定义为单位面积chunk的辐射强度
辐射度radiance:$L=\frac{dI}{dA\cos\theta}$
$L=\frac{dI}{dA\cos\theta}=\left(\frac{d(dP)}{d\omega dA\cos\theta}=\frac{dE}{d\omega\cos\theta}\right)$
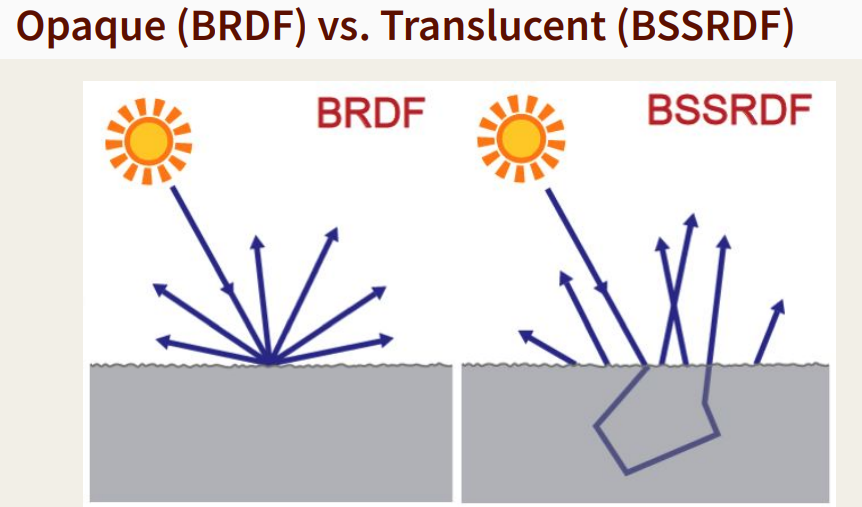
现实世界中,光源来自各个可以看见的物体,光线传播到一个物体material上后,会发生:反射、吸收、传输(散射)
建模materials的方法:
- BRDF —> Reflectance $BRDF(\omega_i,\omega_o)=\frac{dL_o(\omega_o)}{dE_i(\omega_i)}$
- BRDF 模拟在入射方向不变的情况下,每个向外方向反射多少光
- BTDF —> Transmittance
- BSSRDF —> Surface Scattering散射 Reflectance
更精确Lighting方程:根据BRDF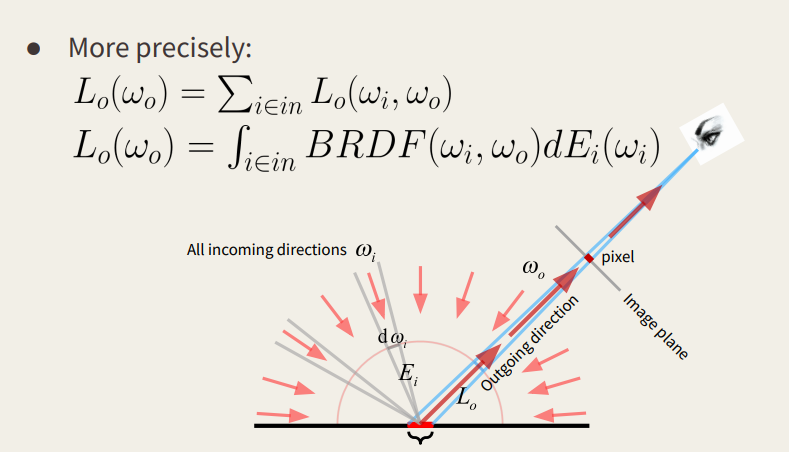
得出:$L_o(\omega_o)=\int_{i\in in}BRDF(\omega_i,\omega_o)L_i\cos\theta_id\omega_i$
HW2
- 焦距和距离等比例变化,焦距越大,照片的信息越多(耳朵变大)