Python中opencv的学习和使用,可以操作图片,跟ps中知识挺像的hhh
0.基本知识的学习 0.1 基本操作 引用库import cv2
cv2.IMREAD_COLOR:彩色图像 RGB 三通道
img = cv2.imread('1.jpg')打开图像——type(img) = numpy.ndarryimg = cv2.imread('1.jpg',cv2.IMREAD_GRAYSCALE)打开为灰度图像cv2.imshow('image',img)展示图像,窗口 imagecv2.waitKey(0)窗口停留时间毫秒级,0 表示按任意键退出cv2.destroyALLWindows()销毁窗口cv2.imwrite('result.jpg',img)保存图像,(文件名,图片)
_可以直接定义一个函数_
1
2
3
4
def cv_show (name,img ): cv2.imshow(name,img) cv2.waitKey(0 ) cv2.destroyALLWindows()
0.1.1 画直线 像素点坐标,左为零,上为零
1
2
3
4
5
6
7
8
9
10
11
12
13
img = np.zeros((320 , 320 , 3 ), np.uint8) print (img.shape) def cv_show (name,img ): cv2.namedWindow(name,0 ) cv2.imshow(name,img) cv2.waitKey(0 ) cv2.destroyAllWindows() cv2.line(img,(0 ,100 ),(100 ,0 ),(0 ,0 ,255 ),2 ) cv2.line(img,(0 ,200 ),(100 ,0 ),(0 ,255 ,0 ),2 ) cv_show('line' ,img)
0.1.2 调用笔记本摄像头 1 2 3 4 5 6 7 8 9 video = cv2.VideoCapture(0 ) ret,frame = video.read() cv2.waitKey(0 ) cv2.waitKey(1 ) cv2.waitKey(1000 ) cv2.release() 调用release()释放摄像头,调用destroyAllWindows()关闭所有图像窗口
0.2 基本属性/函数 img.shape # (414.500.3) (h,w,rgb=3)
0.3 读取视频 cv2.VideoCapture 捕获摄像头
vc = cv2.VideoCapture('test.mp4') 打开视频
1 2 3 4 5 6 7 8 9 10 11 12 13 14 15 16 17 18 19 20 21 22 if vc.isOpened(): open . frame = vc.read() else : open = False while open :while open : ret, frame = vc.read() if frame is None : break if ret == True : gray = cv2.cvtColor(frame,cv2.COLOR_BGR2GRAY) cv2.namedWindow('result' ,0 ) cv2.imshow('result' ,gray) if cv2.waitKey(10 ) & 0xFF == 27 : break vc.release() cv2.destroyAllWindows()
0.4 感兴趣区域 图像截取
1 2 3 img = cv.imread('1.jpg' ) cat = img[0 :200 ,0 :200 ] cv.show('cat' ,cat)
图片截取,(识别技术将匹配到的数据展示)1 2 image_clip = image_rgb[int (top):(int (top) + int (height)), int (left):(int (left) + int (width))] 顺序为[y0:y1, x0:x1]
0.5 特殊选取,切分通道 b:::0
1 2 3 4 5 b,g,r = cv2.split(img) b.shape == g.shape == r.shape img = cv2.merge((b,g,r)) img.shape
0.6 边界填充 图像的边界
1 2 3 4 5 6 7 8 9 10 11 12 13 14 15 16 17 18 19 20 21 22 import cv2def cv_show (name,img ): cv2.imshow(name,img) cv2.waitKey(0 ) cv2.destroyALLWindows() img = cv2.imread('./img/1.jpg' ) top_size, bottom_size, left_size,right_size = (50 ,50 ,50 ,50 ) replicate = cv2.copyMakeBorder(img,top_size,bottom_size,left_size,right_size,borderType = cv2.BORDER_REPLICATE) reflect = cv2.copyMakeBorder(img,top_size,bottom_size,left_size,right_size,borderType = cv2.BORDER_REFLECT) reflect2 = cv2.copyMakeBorder(img,top_size,bottom_size,left_size,right_size,borderType = cv2.BORDER_REFLECT_101) wrap = cv2.copyMakeBorder(img,top_size,bottom_size,left_size,right_size,borderType = cv2.BORDER_WRAP) constant = cv2.copyMakeBorder(img,top_size,bottom_size,left_size,right_size,borderType = cv2.BORDER_CONSTANT)
0.7 数值计算\图像融合\大小放缩 1 2 3 4 5 6 7 8 9 10 11 12 13 14 15 16 17 18 19 20 21 22 23 img1 = cv2.imread('1.jpg' ) img2 = cv2.imread('2.jpg' ) img11 = img1 + 10 img1[:5 ,:,0 ].shape 只打印前五行 img11[:5 ,:,0 ] (img1+img11)[:5 ,:,0 ] 如果超出,则结果取余 cv2.add(img1,img11)[:5 ,:,0 ] 如果超出255 ,则不取余直接用255 img1+img2 img1.shape img2.shape img2 = cv2.resize(img2,(500 ,414 )) img2.shape res = cv2.addWeighted(img1,0.4 ,img2,0.6 ,0 ) res = cv2.resize(img,(0 ,0 ),fx=0.5 ,fy=2 )
0.8 图像阈值 1 2 3 4 5 6 7 8 9 10 11 12 13 14 15 16 17 18 19 20 21 22 23 24 25 26 27 28 29 30 31 32 33 34 cv2.threshold(): 参数: img:图像对象,必须是灰度图 thresh:阈值 0 ~255 eg:127 maxval:最大值 255 type : cv2.THRESH_BINARY: 小于阈值的像素置为0 ,大于阈值的置为maxval 超过阈值部分取最大值maxval=255 white,否则取0 black 亮的地方白,暗的地方黑 cv2.THRESH_BINARY_INV: 小于阈值的像素置为maxval,大于阈值的置为0 亮的地方黑,暗的地方白 cv2.THRESH_TRUNC: 小于阈值的像素不变,大于阈值的置为thresh 指定一个截断值,大于阈值部分变成阈值,小于的不变 cv2.THRESH_TOZERO 小于阈值的像素置0 ,大于阈值的不变 大于阈值部分不变,小于的全变为0 cv2.THRESH_TOZERO_INV 小于阈值的不变,大于阈值的像素置0 大于阈值变为0 ,小于阈值的不变 返回两个值 ret:阈值 img:阈值化处理后的图像 cv2.adaptiveThreshold() 自适应阈值处理,图像不同部位采用不同的阈值进行处理 参数: img: 图像对象,8 -bit单通道图 maxValue:最大值 adaptiveMethod: 自适应方法 cv2.ADAPTIVE_THRESH_MEAN_C :阈值为周围像素的平均值 cv2.ADAPTIVE_THRESH_GAUSSIAN_C : 阈值为周围像素的高斯均值(按权重) threshType: cv2.THRESH_BINARY: 小于阈值的像素置为0 ,大于阈值的置为maxValuel cv2.THRESH_BINARY_INV: 小于阈值的像素置为maxValue,大于阈值的置为0 blocksize: 计算阈值时,自适应的窗口大小,必须为奇数 (如3 :表示附近3 个像素范围内的像素点,进行计算阈值) C: 常数值,通过自适应方法计算的值,减去该常数值 (mean value of the blocksize*blocksize neighborhood of (x, y) minus C)
0.9 图像平滑-去掉噪音点 1 2 3 4 5 6 7 8 9 10 11 12 13 14 15 16 17 18 19 20 21 22 23 24 25 26 27 28 29 30 31 32 33 34 import cv2import numpy as npimg = cv2.imread('./img/1.jpg' ) def cv_show (name,img ): cv2.namedWindow(name,0 ) cv2.imshow(name,img) cv2.waitKey(0 ) cv2.destroyALLWindows() blur = cv2.blur(img,(3 ,3 )) box = cv2.boxFilter(img,-1 ,(3 ,3 ),normalize =True ) aussian = cv2.GaussianBlur(img,(5 ,5 ),1 ) median = cv2.medianBlur(img,5 ) res = np.hstack((blur,aussian,median)) resv = np.vstack((blur,aussian,median)) cv_show('res' ,res)
0.10 形态学-腐蚀操作-去掉毛刺 边界里的盒子如果有 0 有 255,则全变为 0
1 2 3 4 5 import numpy as npkernel = np.ones((5 ,5 ),np.uint8) erosion = cv2.erode(img,kernel,iterations = 2 )
0.11 形态学-膨胀操作 _腐蚀后图像太细,使用膨胀_
1 2 kernel = np.ones((3 ,3 ),np.uint8) dilate = cv2.dilate(erosion,kernel,iterations=1 )
0.12 开运算与闭运算 1 2 3 4 5 6 7 kernel = np.ones((5 ,5 ),np.uint8) opening = cv2.morphologyEx(img,cv2.MORPH_OPEN,KERNEL) kernel = np.ones((5 ,5 ),np.uint8) closing = cv2.morphologyEx(img,cv2.MORPH_CLOSE,kernel)
0.13 梯度运算 1 2 3 kernel = np.ones((7 ,7 ),np.uint8) gradient = cv2.morphologyEx(img,cv2.MORPH_GRADIENT,kernel)
0.14 礼帽 黑帽 1 2 3 4 5 6 tophat = cv2.morphologyEx(img,cv2.MORPH_TOPHAT,kernel) blackhat = cv2.morphologyEx(img,cv2.MORPH_BLACKHAT,kernel)
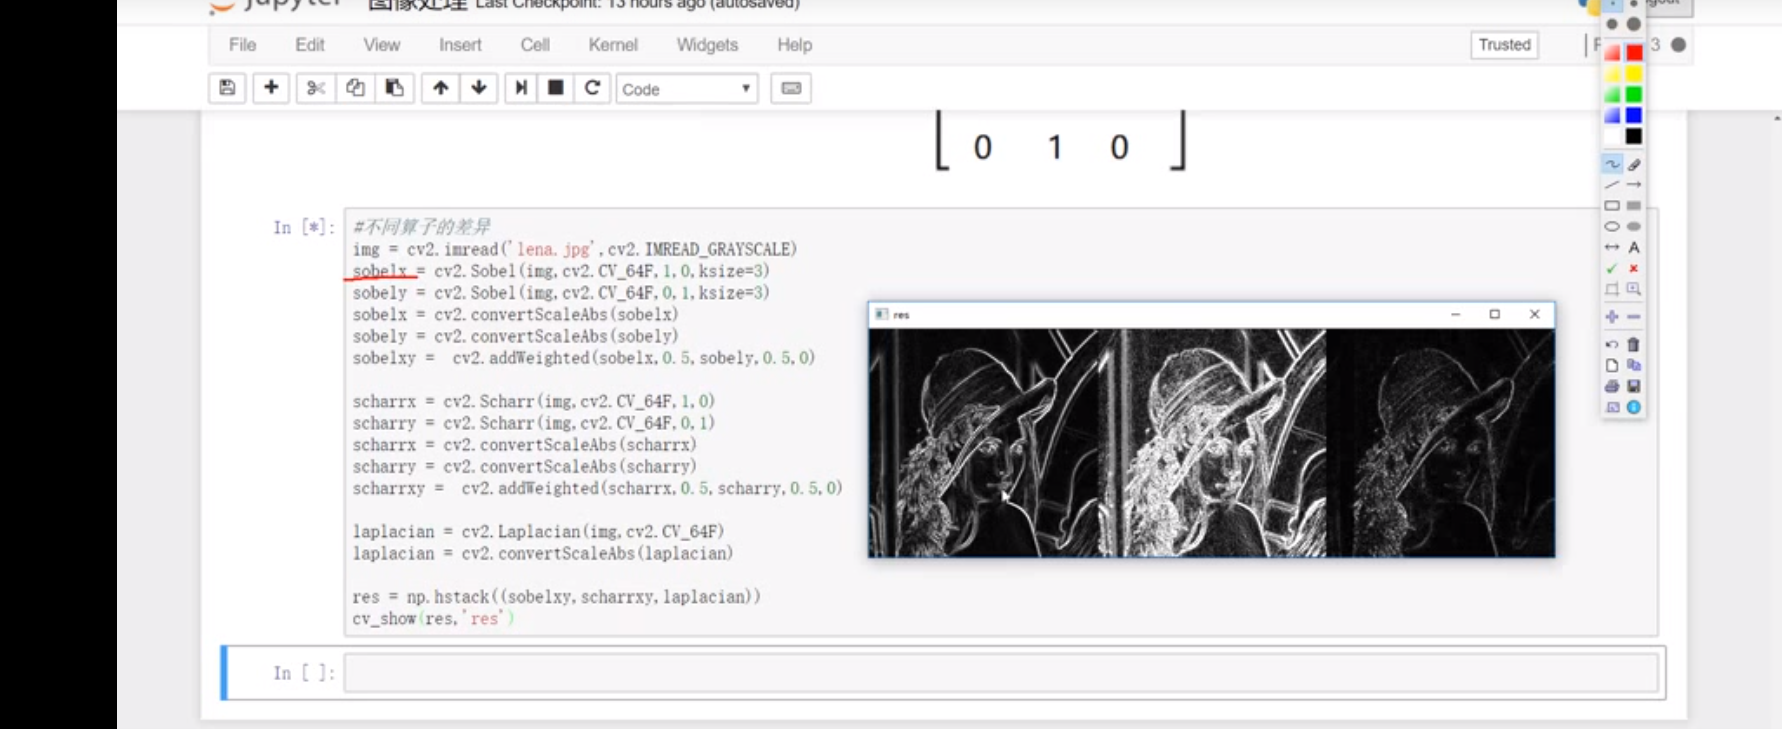
0.15 图像梯度-Sobel 算子
梯度:边缘位置的像素数值不同,数值差越大,梯度越大
1 2 3 4 5 6 7 8 9 10 11 12 13 14 15 16 17 18 19 20 21 22 sobelx = cv2.Sobel(img,cv2.CV_64F,1 ,0 ,ksize = 3 ) sobelx = cv2.convertScaleAbs(sobelx) sobely = cv2.Sobel(img,cv2.CV_64F,0 ,1 ,ksize = 3 ) sobely = cv2.convertScaleAbs(sobely) sobelxy = cv2.addWeighted(sobelx,0.5 ,sobely,0.5 ,0 )
0.16 图像梯度 Scharr&&Laplacian 算子 scharr — 更敏感 — 描绘轮廓更细致
laplacian — 二阶导 — 更更敏感,对噪音点敏感,很少单独使用
1 2 3 4 5 6 7 8 9 10 scharrx = cv2.Scharr(img,cv2.CV_64F,1,0) scharry = cv2.Scharr(img,cv2.CV_64F,0,1) scharrx = cv2.convertScaleAbs(scharrx) scharry = cv2.convertScaleAbs(scharry) scharrxy = cv2.addWeighted(scharrx,0.5,scharry,0.5,0) laplacian = cv2.Laplacian(img,cv2.CV_64F) laplacian = cv2.convertScaleAbs(laplacian) res = np.hstack((scharrxy,laplacian))
三种算子区别
0.17 Canny 边缘检测—综合
高斯滤波器,平滑处理,滤除噪声
计算图像中每个像素点的梯度强度和方向
应用非极大值抑制,消除小的不明显的地方
应用双阈值,检测来确定真实的和潜在的边缘
通过抑制孤立的弱边缘最终完成边缘检测
① 高斯滤波器
1 2 3 4 5 img = cv2.imread('1.jpg' ,cv2.IMREAD_GRAYSCALE) v1 = cv2.Canny(img,80 ,150 ) v2 = cv2.Canny(img,50 ,150 )
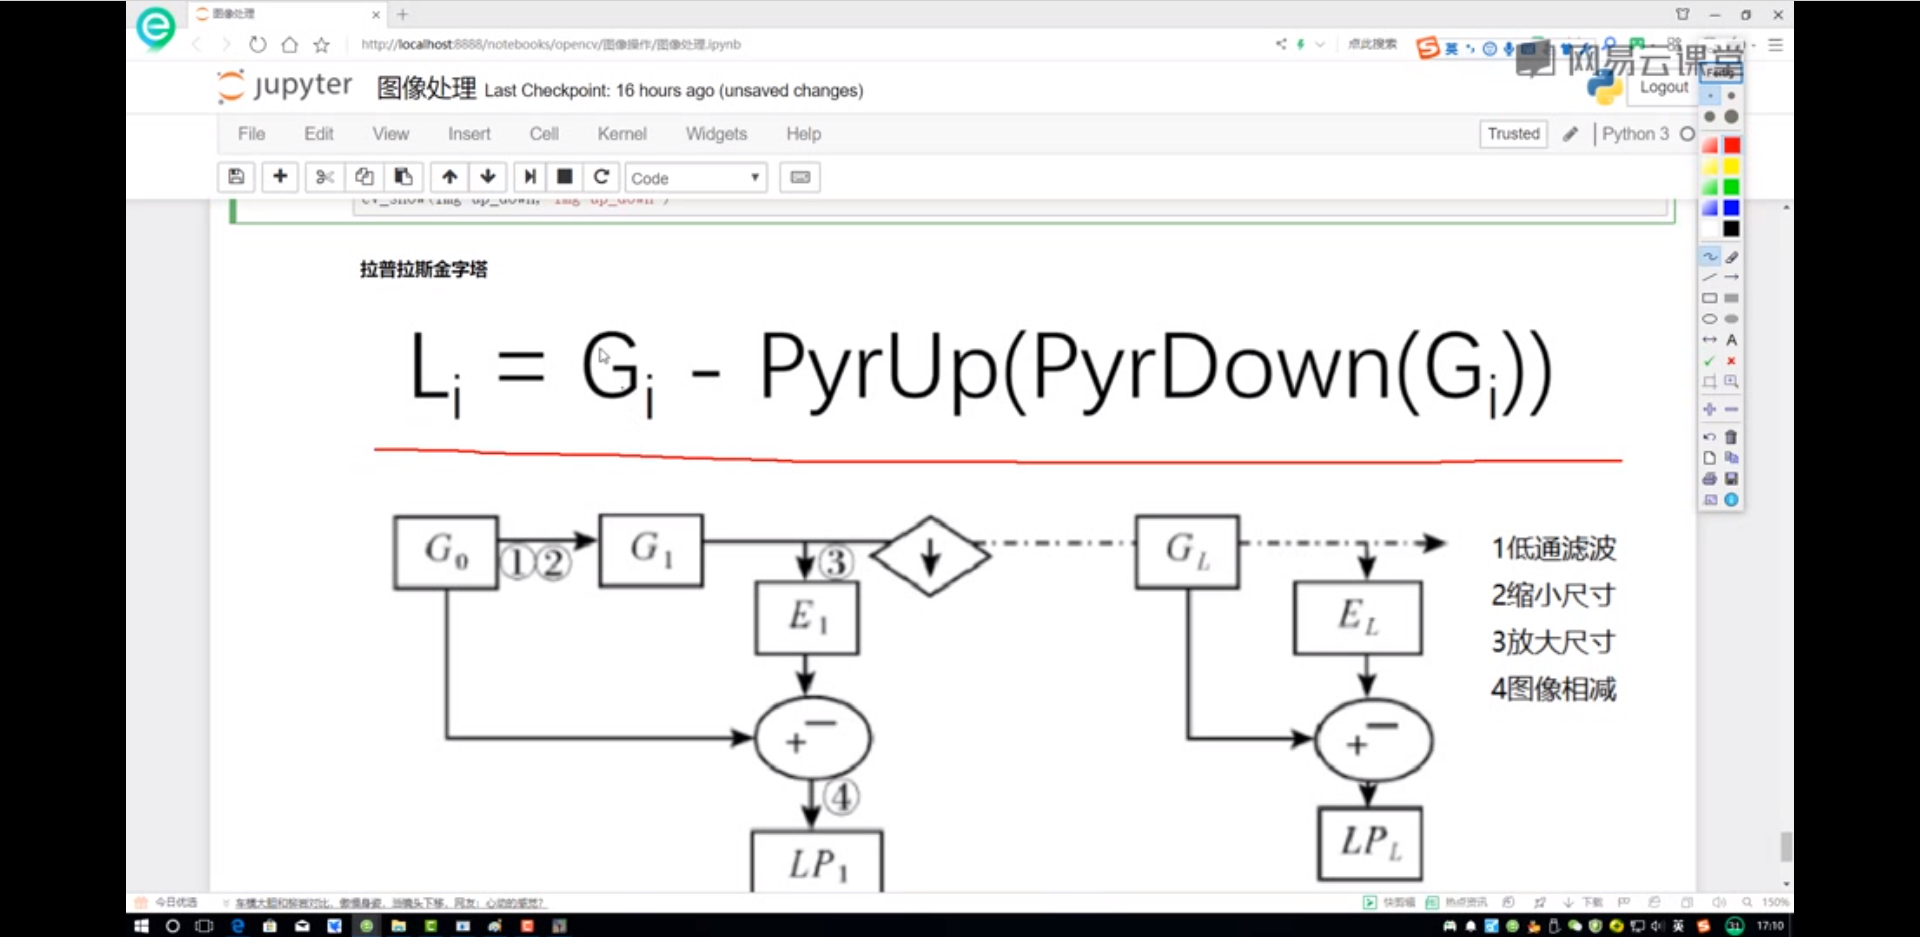
0.18 图像金字塔 越往上走图像越小
向下采样,缩小,往金字塔顶走
向上采样,放大
1 2 3 4 5 6 7 8 img = cv2.imread('1.jpg' ) up = cv2.pyrUp(img) down = cv2.pyrDown(img) down_up = cv2.pyrDown(up)
拉普拉斯金字塔
1 2 3 down = cv2.pyrDown(img) down_up = cv2.pyrUp(down) result = img - down_up
0.19 图像轮廓 图像边缘—零散
mode:轮廓检测模式
method:轮廓逼近方法
1 2 3 4 5 6 7 8 9 10 11 12 13 14 15 16 17 18 19 20 21 22 23 24 25 26 27 28 img = cv2.imread('1.jpg' ) gray = cv2.cvColor(img,cv2.COLOR_BGR2GRAY) ret, thresh = cv2.threshold(gray,122 ,255 ,cv2.THRESH_BINARY) binary,contours,hierarchy = cv2.findContours(thresh,cv2.RETR_TREE,cv2.CHAIN_APPROX_NONE) draw_img = img.copy() res = cv2.drawContours(draw_img,contours,-1 ,(0 ,0 ,255 ),2 ) cnt = contours[0 ] cv2.contourArea(cnt) cu2.arcLength(cnt,True )
轮廓近似
1 2 3 4 5 6 7 8 9 10 11 12 13 14 15 16 17 18 19 img = cv2.imread('1.jpg' ) gray = cv2.cvColor(img,cv2.COLOR_BGR2GRAY) ret, thresh = cv2.threshold(gray,122 ,255 ,cv2.THRESH_BINARY) binary,contours,hierarchy = cv2.findContours(thresh,cv2.RETR_TREE,cv2.CHAIN_APPROX_NONE) cnt = contours[0 ] draw_img = img.copy() res = cv2.drawContours(draw_img,[cnt],-1 ,(0 ,0 ,255 ),2 ) epsilon = 0.1 *cv2.arcLength(cnt,True ) approx = cv2.approxPolyDP(cnt,epsilon,True ) draw_img = img.copy() res = cv2.drawContours(draw_img,[approx],-1 ,(0 ,0 ,255 ),2 )
边界矩形(外接矩形)
1 2 3 4 5 6 7 8 9 10 11 cnt = contours[0 ] x,y,w,h = cv2.boundingRect(cnt) img = cv2.rectangle(img,(x,y),(x+w,y+h),(0 ,0 ,255 ),2 ) area = cv2.contourArea(cnt) x,y,w,h = cv2.boundingRect(cnt) rect_area = w*h extent = float (area) / rect_area print (f'轮廓面积与边界矩形比:{extent} ' )
外接圆
1 2 3 4 (x,y).radius = cv2.minEnclosingCircle(cnt) center = (int (x),int (y)) radius = int (radius) img = cv2.circle(img,center,radius,(0 ,255 ,0 ),2 )
0.20 模板匹配——匹配对象在另一个图像哪里 从左到右,从上到下,进行匹配
TM_SQDIFF——平方项匹配,值越小,越相关
TM_CCORR——-计算相关性,值越大,越相关
TM_CCOEFF——计算相关系数,值越大,越相关
TM_SQDIFF_NORMED:计算归一化平方不同,越接近 0,越相关
TM_CCORR_NORMED:计算归一化相关性,越接近 1,越相关
TM_CCOEFF_NORMED:计算归一化的相关系数,越接近 1,越相关
最好用归一化的方法
1 2 3 4 5 6 7 8 9 10 11 12 13 14 15 16 17 18 19 20 img = cv2.imread('1.jpg' ,0 ) template = cv2.imread('11.jpg' ,0 ) h,w = template.shape[:2 ] res = cv2.matchTemplate(img,template,cv2.TM_SQDIFE) min_val,max_val,min_loc,max_loc = cv2.minMaxLoc(res) top_left = min_loc bottom_right = (top_left[0 ] + w,top_left[1 ] + h) img2 = img.copy() cv2.rectangle(img2,top_left,bottom_right,255 ,2 ) cv_show('res' ,img2)
匹配多个对象
1 2 3 4 5 6 7 8 9 10 11 12 13 14 15 img_rgb = cv2.imread('1.jpg' ) img_gray = cv2.cvtColor(img_rgb,cv2.COLOR_BGR2GRAY) template = cv2.imread('11.jpg' ,0 ) h,w = template.shape[:2 ] res = cv2.matchTemplate(img_gray,template,cv2.TM_CCOEFF_NORMED) threshold = 0.8 loc = np.where(res>= threshold) for pt in zip (*loc[::1 ]): bottom_right = (pt[0 ]+w,pt[1 ]+h) cv2.rectangle(img_rgb,pt,bootom_right,(0 ,0 ,255 ),2 ) cv2.imshow('img' ,img_rgb) cv2.waitKey(0 )
0.21 直方图 图片像素的统计直方图
hist = cv2.calcHist([img],[0],None,[256],[0,256])
1 2 3 4 5 img =cv2.imread('1.jpg' ) hist = cv2.calcHist([img],[0 ],None ,[256 ],[0 ,256 ]) plt.hist(img,ravel(),256 ): plt.show
直方图均衡化
1 2 3 4 5 6 7 8 9 10 equ = cv2.equalizeHist(img) plt.hist(equ,ravel(),256 ) plt.show
自适应直方图均衡化
1 2 3 clahe = cv2.createCLAHE(clipLimit = 2.0 ,tileGridSize = (8 ,8 )) res_clahe = clahe.apply(img) cv2.imshow('result' ,res_clahe)
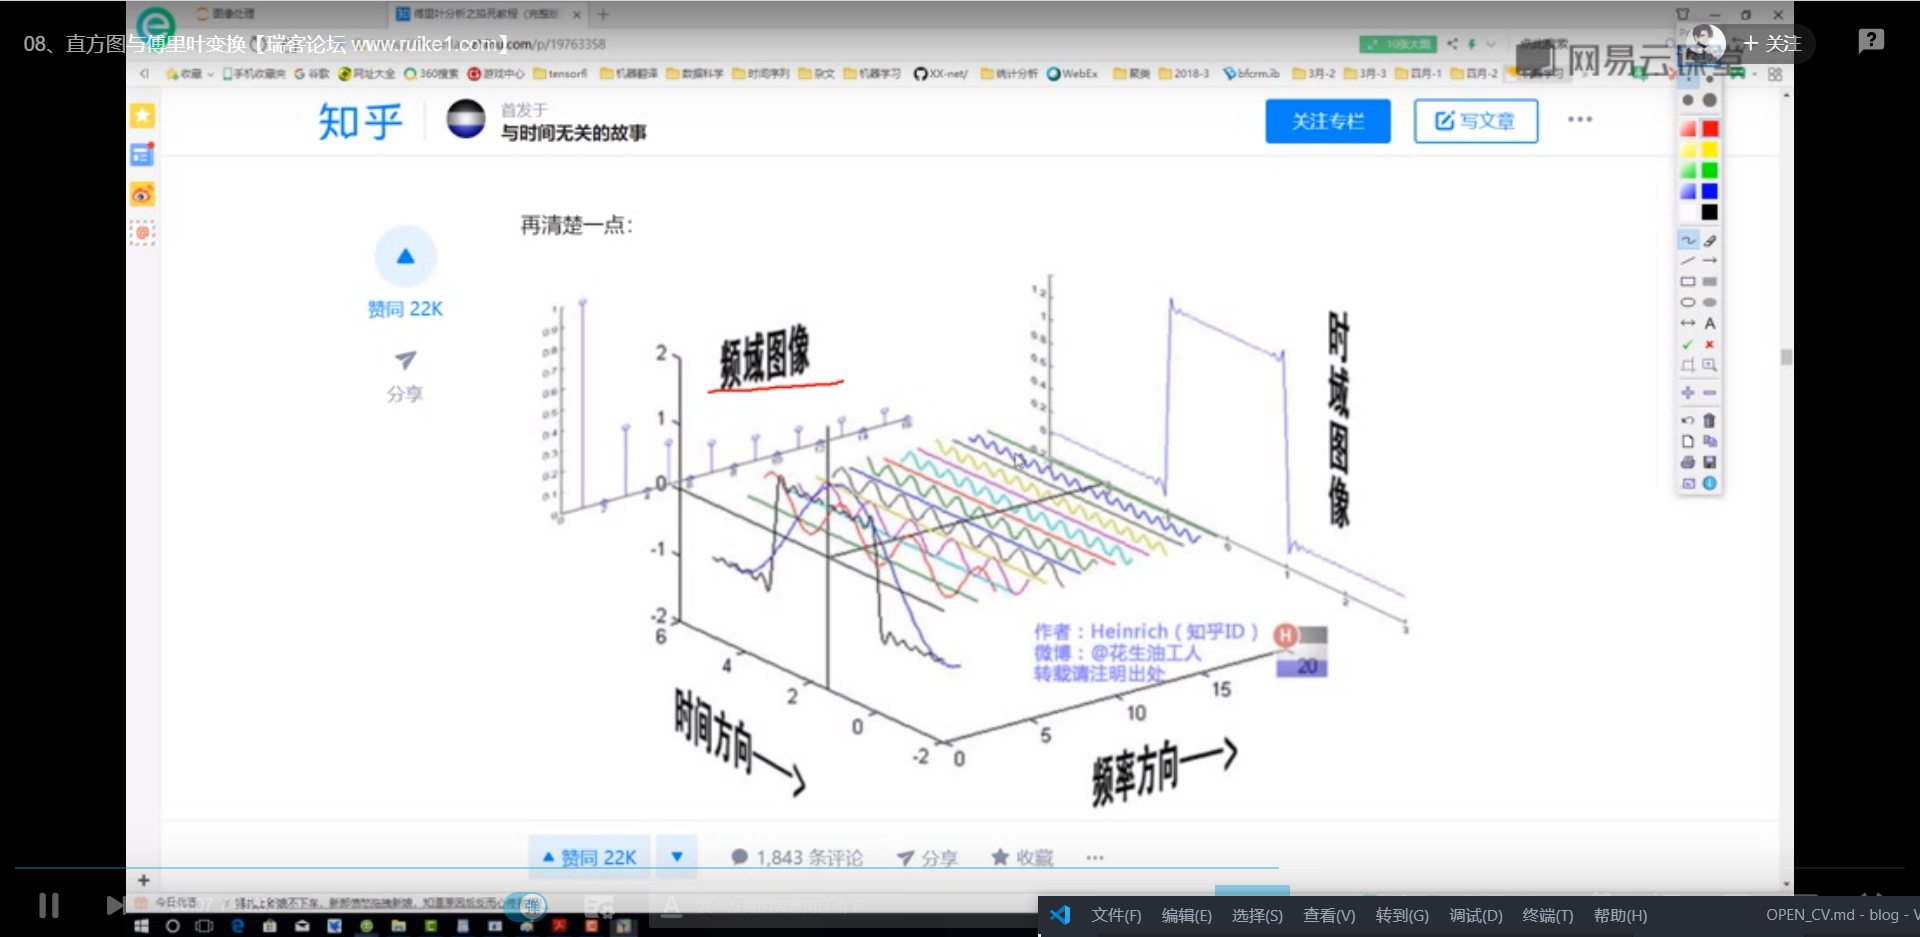
0.22 傅里叶变换 现实中的事物都是运动的
在 频域中处理,更加方便
1 2 3 4 5 6 7 8 9 10 11 12 13 14 15 16 cv2.dft() cv2.idft() import numpy as npimport cv2from matplotlib import pyplot as pltimg = cv2.imread('1.jpg' ,0 ) img_float32 = np.float32(img) dft = cv2.dft(img_float32,flags = cv2.DFT_COMPLEX_OUTPUT) dft_shift = np.fft.fftshift(dft) magnitude_spectrum = 20 *np.log(cv2.magnitude(dft_shift[:,:,0 ],dft_shift[:,:,1 ]))
低通:
1 2 3 4 5 6 7 8 9 10 11 12 13 14 15 16 17 18 19 20 21 22 23 24 25 26 27 28 29 30 31 32 33 34 35 36 37 38 39 40 import numpy as npimport cv2from matplotlib import pyplot as pltdef cv_show (name,img ): cv2.namedWindow(name,0 ) cv2.imshow(name,img) cv2.waitKey(0 ) cv2.destroyAllWindows() img = cv2.imread('./img/clock1.jpg' ,0 ) img_float32 = np.float32(img) dft = cv2.dft(img_float32,flags = cv2.DFT_COMPLEX_OUTPUT) dft_shift = np.fft.fftshift(dft) rows,cols = img.shape crow,ccol = int (rows/2 ) , int (cols/2 ) mask = np.zeros((rows,cols,2 ),np.uint8) mask[crow-30 :crow+30 ,ccol-30 :ccol+30 ] = 1 fshift = dft_shift*mask f_ishift = np.fft.ifftshift(fshift) img_back = cv2.idft(f_ishift) img_back = cv2.magnitude(img_back[:,:,0 ],img_back[:,:,1 ]) plt.subplot(121 ), plt.imshow(img,cmap = 'gray' ) plt.title('input image' ), plt.xticks([]),plt.yticks([]) plt.subplot(122 ), plt.imshow(img_back, cmap = 'gray' ) plt.title('magnitude spectrum' ), plt.xticks([]),plt.yticks([]) plt.show() 图像模糊
高通
1 2 3 4 5 6 7 8 9 10 11 12 13 14 15 16 17 18 19 20 21 22 23 24 25 26 27 28 29 30 31 32 33 34 35 36 37 38 import numpy as npimport cv2from matplotlib import pyplot as pltdef cv_show (name,img ): cv2.namedWindow(name,0 ) cv2.imshow(name,img) cv2.waitKey(0 ) cv2.destroyAllWindows() img = cv2.imread('./img/clock1.jpg' ,0 ) img_float32 = np.float32(img) dft = cv2.dft(img_float32,flags = cv2.DFT_COMPLEX_OUTPUT) dft_shift = np.fft.fftshift(dft) rows,cols = img.shape crow,ccol = int (rows/2 ) , int (cols/2 ) mask = np.ones((rows,cols,2 ),np.uint8) mask[crow-30 :crow+30 ,ccol-30 :ccol+30 ] = 0 fshift = dft_shift*mask f_ishift = np.fft.ifftshift(fshift) img_back = cv2.idft(f_ishift) img_back = cv2.magnitude(img_back[:,:,0 ],img_back[:,:,1 ]) plt.subplot(121 ), plt.imshow(img,cmap = 'gray' ) plt.title('input image' ), plt.xticks([]),plt.yticks([]) plt.subplot(122 ), plt.imshow(img_back, cmap = 'gray' ) plt.title('magnitude spectrum' ), plt.xticks([]),plt.yticks([]) plt.show()
0.23 摄像头获取视频或图片获取感兴趣部分 1 2 3 4 5 6 7 8 9 10 11 12 13 14 15 16 17 18 19 20 21 22 23 24 25 26 27 28 29 import cv2def video_show (): choose_video = False while True : ret1,frame = video.read() if not ret1: print ("视频获取失败!" ) break cv2.imshow("Video_show" ,frame) if cv2.waitKey(1 ) & 0xff == ord ("q" ): select_data = cv2.selectROI("Video_show" ,frame) choose_video = True if choose_video : choose_data = frame[select_data[1 ]:select_data[1 ]+select_data[3 ],select_data[0 ]:select_data[0 ]+select_data[2 ]] cv2.imshow("choose_video" ,choose_data) if cv2.waitKey(1 ) & 0xff == ord ("p" ): break video.release() return choose_data if __name__ == "__main__" : video = cv2.VideoCapture(0 ) video_show()
0.23.1 选取 roi 区域定义 1 2 3 4 5 6 7 imageROI = image(Rect(500 ,250 ,logo.cols,logo.rows)); imageROI = image(Range(250 ,250 +logoImage.rows),Range(200 ,200 +logoImage.cols));
1. 图像识别相关 1.1 两张图片对比 返回一张对比后的图片
轮子安装pip install pillowpip install PIL
1 2 3 4 5 6 7 8 9 10 11 12 13 14 15 16 17 18 19 20 21 22 23 24 25 26 27 28 29 30 31 32 33 34 35 36 from PIL import Imagefrom PIL import ImageChopsdef compare_images (path_one, path_two, diff_save_location ): """ 比较图片,如果有不同则生成展示不同的图片 @参数一: path_one: 第一张图片的路径 @参数二: path_two: 第二张图片的路径 @参数三: diff_save_location: 不同图的保存路径 """ image_one = Image.open (path_one) image_two = Image.open (path_two) try : diff = ImageChops.difference(image_one, image_two) if diff.getbbox() is None : print ("【+】We are the same!" ) else : diff.save(diff_save_location) except ValueError as e: text = ("表示图片大小和box对应的宽度不一致,参考API说明:Pastes another image into this image." "The box argument is either a 2-tuple giving the upper left corner, a 4-tuple defining the left, upper, " "right, and lower pixel coordinate, or None (same as (0, 0)). If a 4-tuple is given, the size of the pasted " "image must match the size of the region.使用2纬的box避免上述问题" ) print ("【{0}】{1}" .format (e, text)) if __name__ == '__main__' : name1 = './对比图片/' + input ('输入要对比的图片名字---带后缀格式----:' ) name2 = './对比图片/' + input ('第二张图片的名字:' ) name = '对比结果' + input ('你的对比结果后缀是什么:' ) compare_images(name1, name2, name) print ('-------已完成-------' )
参考教程
2. 根据数据生成表格,图线 openpyxl and plotly or plt
3. 慢慢学 opencv 先行教程
3.1 在新窗口打开图片,保存图片,基操 1 2 3 4 5 6 7 8 9 10 11 12 13 14 15 16 17 18 19 20 import cv2img_path = './img/' + input ('输入图像路径:--带后缀--' ) h = cv2.imread(img_path,cv2.IMREAD_GRAYSCALE) cv2.namedWindow('printwindow' ) cv2.namedWindow('window' ,0 ) imgviewx = cv2.cvtColor(imgviewx,cv2.COLOR_BGR2GRAY) cv2.imshow('printwindow' ,h) cv2.waitKey(0 ) cv2.imwrite('./img/result.jpg' ,imgviewx) cv2.destroyAllWindows()
3.2 图像阈值化 参数说明:
1 2 3 4 5 6 7 8 9 10 11 12 13 14 15 16 17 18 19 20 21 22 23 24 25 26 27 28 cv2.threshold(): 参数: img:图像对象,必须是灰度图 thresh:阈值 maxval:最大值 type : cv2.THRESH_BINARY: 小于阈值的像素置为0 ,大于阈值的置为maxval cv2.THRESH_BINARY_INV: 小于阈值的像素置为maxval,大于阈值的置为0 cv2.THRESH_TRUNC: 小于阈值的像素不变,大于阈值的置为thresh cv2.THRESH_TOZERO 小于阈值的像素置0 ,大于阈值的不变 cv2.THRESH_TOZERO_INV 小于阈值的不变,大于阈值的像素置0 返回两个值 ret:阈值 img:阈值化处理后的图像 cv2.adaptiveThreshold() 自适应阈值处理,图像不同部位采用不同的阈值进行处理 参数: img: 图像对象,8 -bit单通道图 maxValue:最大值 adaptiveMethod: 自适应方法 cv2.ADAPTIVE_THRESH_MEAN_C :阈值为周围像素的平均值 cv2.ADAPTIVE_THRESH_GAUSSIAN_C : 阈值为周围像素的高斯均值(按权重) threshType: cv2.THRESH_BINARY: 小于阈值的像素置为0 ,大于阈值的置为maxValuel cv2.THRESH_BINARY_INV: 小于阈值的像素置为maxValue,大于阈值的置为0 blocksize: 计算阈值时,自适应的窗口大小,必须为奇数 (如3 :表示附近3 个像素范围内的像素点,进行计算阈值) C: 常数值,通过自适应方法计算的值,减去该常数值 (mean value of the blocksize*blocksize neighborhood of (x, y) minus C)
例子
1 2 3 4 5 6 7 8 9 10 11 12 13 14 15 import cv2imgpath = './img/' + input ('输入图像路径' ) imgviewx = cv2.imread(imgpath) imgviewx = cv2.cvtColor(imgviewx,cv2.COLOR_BGR2GRAY) imgresult = cv2.copyMakeBorder(imgviewx,20 ,20 ,20 ,20 ,cv2.BORDER_DEFAULT) ret,threl = cv2.threshold(imgviewx,127 ,255 ,cv2.THRESH_BINARY) cv2.namedWindow('window2' ,0 ) cv2.imshow('window2' ,threl) cv2.waitKey(0 ) cv2.destroyALLWindows()
3.3 图像形状变化 3.3.1 cv2.resize() 图像缩放 参数
1 2 3 4 5 6 7 8 9 10 11 12 13 14 cv2.resize() 放大和缩小图像 参数: src: 输入图像对象 dsize:输出矩阵/图像的大小,为0 时计算方式如下:dsize = Size(round (fx*src.cols),round (fy*src.rows)) fx: 水平轴的缩放因子,为0 时计算方式: (double)dsize.width/src.cols fy: 垂直轴的缩放因子,为0 时计算方式: (double)dsize.heigh/src.rows interpolation:插值算法 cv2.INTER_NEAREST : 最近邻插值法 cv2.INTER_LINEAR 默认值,双线性插值法 cv2.INTER_AREA 基于局部像素的重采样(resampling using pixel area relation)。对于图像抽取(image decimation)来说,这可能是一个更好的方法。但如果是放大图像时,它和最近邻法的效果类似。 cv2.INTER_CUBIC 基于4x4像素邻域的3 次插值法 cv2.INTER_LANCZOS4 基于8x8像素邻域的Lanczos插值 cv2.INTER_AREA 适合于图像缩小, cv2.INTER_CUBIC (slow) & cv2.INTER_LINEAR 适合于图像放大
1 2 3 4 5 6 7 8 9 10 11 12 import cv2import numpy as npimg = cv2.imread('messi5.jpg' ) res = cv2.resize(img,None ,fx=2 , fy=2 , interpolation = cv2.INTER_CUBIC) height, width = img.shape[:2 ] res = cv2.resize(img,(2 *width, 2 *height), interpolation = cv2.INTER_CUBIC)
3.3.2 仿射变换 仿射变换(从二维坐标到二维坐标之间的线性变换,且保持二维图形的“平直性”和“平行性”。仿射变换可以通过一系列的原子变换的复合来实现,包括平移,缩放,翻转,旋转和剪切)参数
1 2 3 4 5 6 7 8 9 cv2.warpAffine() 仿射变换(从二维坐标到二维坐标之间的线性变换,且保持二维图形的“平直性”和“平行性”。仿射变换可以通过一系列的原子变换的复合来实现,包括平移,缩放,翻转,旋转和剪切) 参数: img: 图像对象 M:2 *3 transformation matrix (转变矩阵) dsize:输出矩阵的大小,注意格式为(cols,rows) 即width对应cols,height对应rows flags:可选,插值算法标识符,有默认值INTER_LINEAR, 如果插值算法为WARP_INVERSE_MAP, warpAffine函数使用如下矩阵进行图像转dst(x,y)=src(M11*x+M12*y+M13,M21*x+M22*y+M23) borderMode:可选, 边界像素模式,有默认值BORDER_CONSTANT borderValue:可选,边界取值,有默认值Scalar()即0


